CHANGING YOUR MINI CLUBMAN FROM DRUM BRAKES TO METRO 4 POT VENTED BRAKES
There is surprisingly little information about converting to disc using the universal donor car the Mini Metro. This car came with 8.4" discs and four pot opposed piston callipers (which on a Mini prove very effective). Now I managed to find a place that in England that would sell me the parts for about AUD$180. Which sounded like a bargain. But to send the parts would cost me AUD$270-360.00. So I guess I had to say no.
Now there a pro's and cons to everthing and the Metro conversions is no exception. In researching this idea I came across alot of conflicting information about converting using all Metro parts especially Metro swivel hubs.
Note: Don't use the Metro hubs. It is a false economy, while you can buy the whole thing as a complete unit, this leads to problems with the steering geometry etc. While they are quite expensive, it makes life so much easier and the car will run perfectly if you buy Mini disc hubs, the tutorial here works on the premise that Mini hubs NOT metro hubs have been used. I used them and everthing else just bolts straight on. Don't Argue. But if you still aren't convinced read below and tell me whether you think this isn't a pain in the arse.
Circa 2001.
But I think I may have got to the bottom of the problem now. I have been talking to a very well informed bloke named Mark Downie on the net and he sent me the information below in reply to the following questions:
- Do Metro hubs give a positive camber
- What drive shafts work wiht the metro hubs and flanges
- Do you use Cooper S drive shafts and CV's??
- And finally can I put Mini ball joints on to Metro Hubs??
Marks Reply:
Matt, Metro hubs do give positive camber but that is fixed with a set of adjustable bottom arms. You use normal mini drive shafts but you have to use the metro cv's as they are bigger in size but have the same spline for the sfats, also Mini ball joints will screw straight onto the metro hubs the only difference is the bottom metro one is bigger in diamter the top one doesn't have to be changed.
Now to clarify, you can get standard bottom arms that have been lengthened to give a 1.5 degree increase or negative camber which should theoretically cancel out the positive camber created by the hubs. Adjustable bottom arms might not get you passed some rego inspectors, especially rose jointed (seam welded bottom arms).
But you can always go the dodge root and buy the lengthened arms to get through rego and then the adjustables after you get the all important rego sticker. As for the question that occurred to me about the ball joints. You may have to purchase a new ball joint for the Metro which has the same taper on the finger as a Mini balljoint and this will get you passed the larger diameter problem.
Finally there is also another good article to read if you want to get serious about this and that is located on the SA Modified Mini Car Club site and was written by a woman named Gemma Kernich.
|
Click on picture for a larger view |
||
|
Step by step removal and installation of brakes |

Overview of brake setup |
This is a view of the drum brake setup with the drum removed |
|
STEP 1: Obtain a set of authentic Mini Hubs |
 |
This is vitally important and can be obtained from most Mini Spares places around Australia, but be prepared to shell out a bit of money. I bought a second hand set that had been fully reconditioned for approximately $1100. This was everything hubs (with new swivel joints), cv's, discs (8.4 inch solid), and flange. So not bad and this will be enough to bring good braking to your Mini, a vast improvement on what you experience with drums. |
|
STEP 2: Obtain a Metro Conversion Pack |
 |
This can be obtained from numerous sources. I obtained mine from Mini Spares in Britain while I was over there working. Obviously this is a little more difficult for people in Australia. From memory it cost me about $250 for the whole system so they aren't that expensive. Unfortunately the frieght would probably kill you (vastly more than the cost of the parts). Therefore you have to try and find a place that imports the kits the Australia Direct branch of Mini Spares may be a way to go. |
|
STEP 3: Obtain Disc Brake CV Joints |
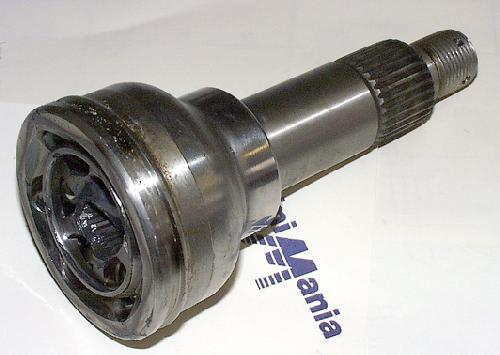 |
You can actually buy brand new cv joints. Given the cost of reconditioned ones you might as well buy brand new ones. Cost will be around $400. At least that's what I paid. Basically the difference between these CV's and the ones for drums is that the diameter of the drive shaft end is thicker. This is to accommodate the extra stress that the CV takes and the force that is exerted during acceleration and braking. |
|
Now how to put them on... |
||
|
Step 1 |
  |
|
|
Step 2 |
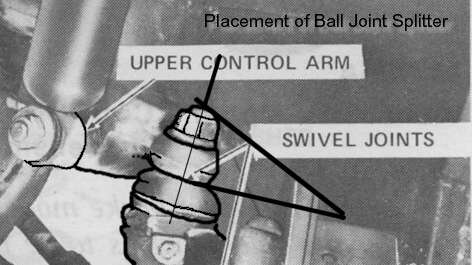 |
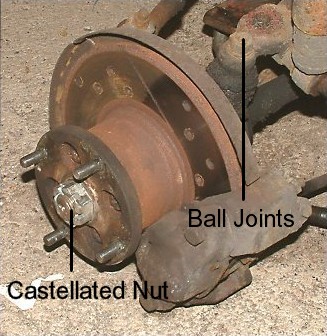
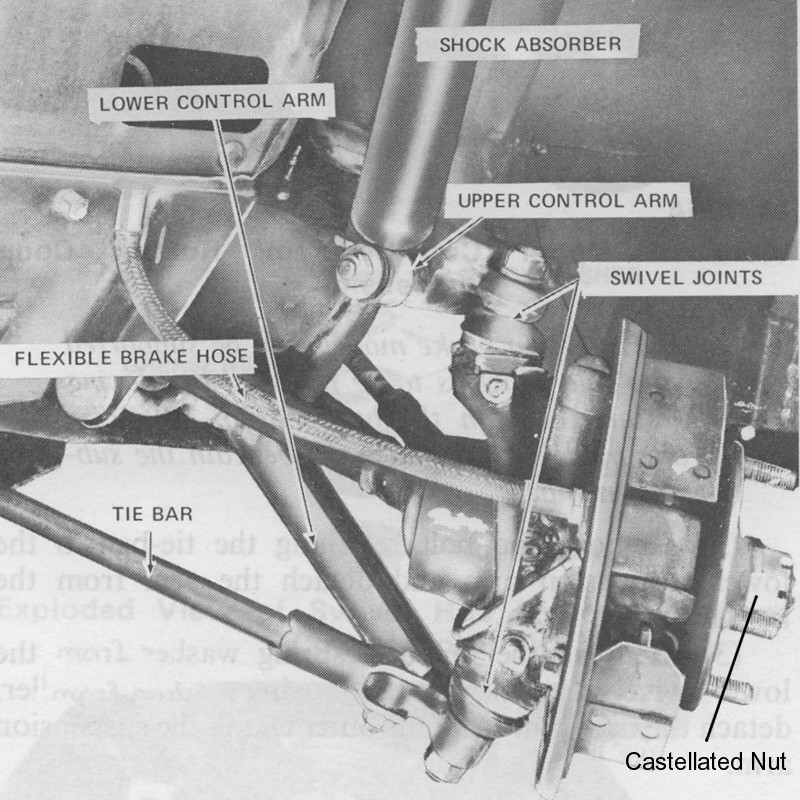
Once the drum is off and the castellated nut has been removed, split the ball joints both upper and lower. This is done by loosening the nut at the top of the ball joint, and bring up so that top of the nut sits flush with the top of the pin. I am assuming you are using a scissor type ball joint splitter, place this with the fork end between the bottom of the suspension arm and the domed lower part of the balljoint. Tighten the bolt at the opposite end and eventually you should hear a loud crack. Continue to undo the bolt on the balljoint. Repeat process for bottom balljoint. |
|
Step 3 |
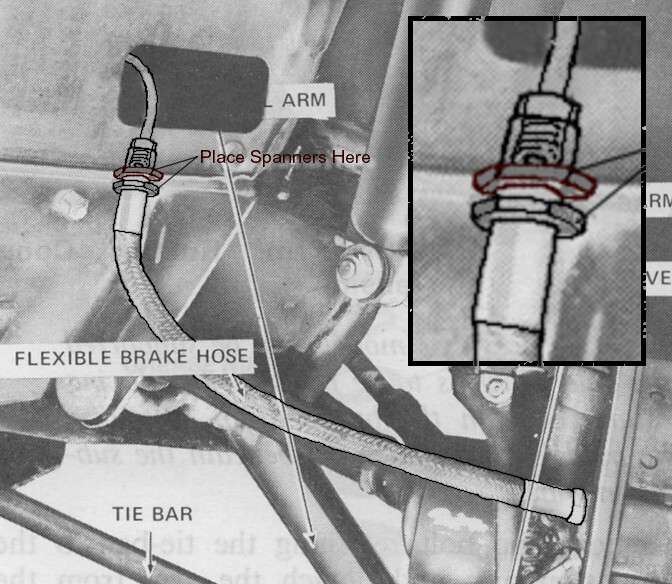 |
Disconnect brake hose from caliper. This can be tricky as you will need to undo the junction where the hose connects to the subframe. And no one tells you that you can't undo it by trying to undo the hose junction in the wheel well. Here is a photo of the junction (there is nut on the inside of the engine bay). This is a two person job in that it requires someone to hold a spanner on the bottom nut as you undo the top one with another spanner (Note: Due to metal brake pipe running through the middle it is impossible to get a socket on it. You have to use an open ended spanner, and loosen from inside the engine bay or through the very small apeture in the side that small window directly above where the hose connect to the body! In the picture I have actually drawn how it would look if you could actually see through the metal). Use the spanner inside the wheelwell to hold is steady as you try and loosen it. Once even slightly loose you can use the spanner in the wheelwell to take the hose end out. Also note that hose is essentially a bolt inside the wheel well there is nut and into the end of the hose also screws the steel line from the master cylinder. Trust me if you're wondering why I am writing so much about this stage attempt it and you may understand unless you are a god in the garage! |
|
Step 4 |
 |
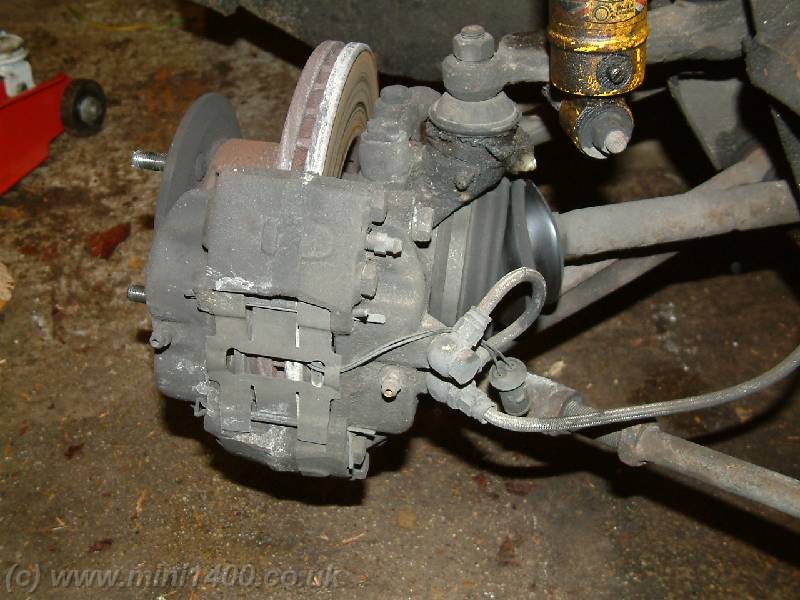
Do this process for both brake hose junctions there are one either side of the engine bay. Once you have the hoses disconnected from the brake junctions you can then set about taking the brake hubs off. Assuming that you have broken the ball joints and disconnected the swivel joints where the steering rack attaches to the hubs. Then it should just require a bit of elbow grease to loosen the hubs from the upper and lower suspension arms (control arms or whatever you want to call them.). Remove the hubs and place them somewhere. You are now ready to put in the new disc brake hubs. You can compare at this stage basically the drum brake hub is smaller in circumference and the diametre of the hose where the CV joint and stub axle slide through is smaller. |
|
Step 5 |
  |
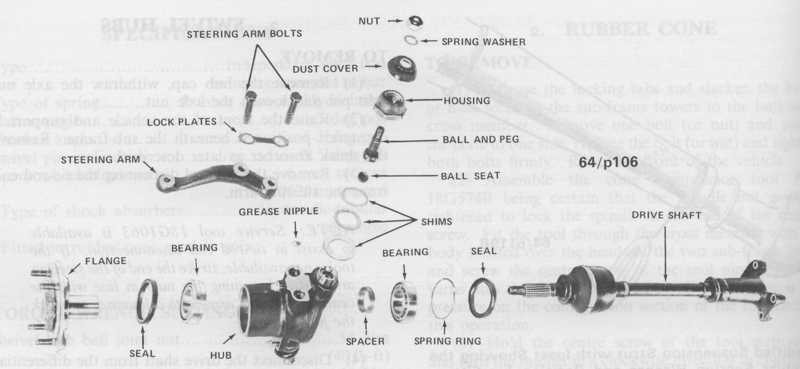
Installation of the disc hub is the reverse of removal (bad joke). But essentially it is. But here a few points to remember. Adjust ball joints prior to installation. And then install the lower balljoint into the aperture of the lower suspension arm, put on washer and do nut up finger tight. Place the bearing cup, inner grease seal and spacer on the CV joint/drive shaft (see pic for full description). Apply plenty of molybdenum grease (or you version of high temp grease) to the drive shaft and then slide through the hub as far it can go. This could be a little tricky as the spacer can sometimes fall and stop the passage of the drive shaft. But you will get it eventually. You will know when you have got it all the way through as there should be plenty of thread showing at the tip of the driveshaft where the castellated nut goes on. Ensure that the drive shaft hasn't dropped out of the diff at the other as come sometimes happen especially cup type diffs (yes I have forgotten the technical term). Once in place move the drive shaft/CV joint and hub up so that the top balljoint pokes throught the top suspension arm and put the washer and nut on the ball joint threads and do them up only finger tight. Then place the outer, bearing cup, roller bearing, grease seal and cone washer on the outer end of the drive shaft. Once this is all in position put on the castellated nut and torque to appropriate level ( ) and place split pin through. Now you may find that the holes don't align for the split pin this may require you to loosen off or tighten slightly to align, but don't go overboard. |
|
Step 6 |
 |
Well almost finished... Attach the brake hose to the brake calliper. Now if you are using the 4 pot vented ones then this gets a little tricky as there is a two threaded holes for the brake hose. But you should have received a pair of hoses for each calliper, the main hose and a banjo hose (probably goodrich braided hoses, very nice!). Attached the hoses in the usual way (screw them into the callipers but carefully). Now don't do what I did the first time and mount them upside down! Make sure the bleed nipple is at the top and not the bottom. Otherwise you will get absolutely no pedal pressure no matter how much you bleed them!!! Now the tricky part. I am sure there is someway professional way to ensure this doesn't happen but fucked if I know what it is. And obviously my mate at the workshop who has worked on Minis doesn't know either. What am I talking about. Well kinks in the brake hoses. It is very easy when you go to attach the brake hose to the brake
junction on the side of the engine bay to get the brake hose winding
around itself, like this 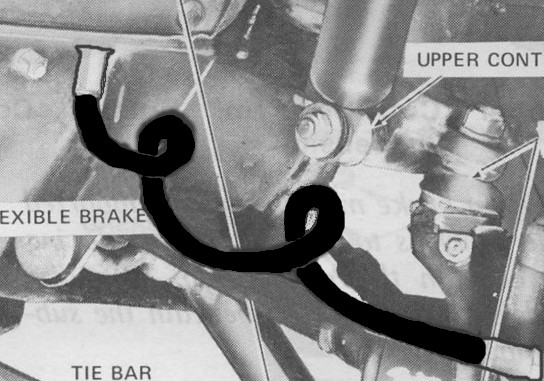 |